Archangel Developer Guide
- 1. Introduction
- 2. Setting up
- 3. Design
- 4. Implementation
- 5. Documentation, logging, testing, configuration, dev-ops
- 6. Appendix: Requirements
- 7. Appendix A: Instructions for manual testing
1. Introduction
1.1 Purpose
This document describes the setting up, design, implementation, documentation of Archangel.
1.2 Audience
The whole documentation is in general for anyone who wants to understand the documentation and implementation of Archangel. The following groups are the intended target of this documentation.
- CS2101/CS2103T Teaching Team - to evaluate Archangel’s software architecture, design, implementation and documentation.
- CS2103T Students - to understand Archangel’s software architecture, design, implementation and documentation in order to enhance and implement some of the features inside the software.
1.3 How to use this guide
This Developer Guide is written in a top-down manner, starting with the overall architecture of Archangel, followed by in-depth descriptions of individual features implemented.
To navigate to a specific section in this guide, you can click on individual headers in the Table of Contents at the top of this markdown document to jump to that section. Within each section, we have also provided brief introductory statements where necessary.
2. Setting up
Refer to the guide Setting up and getting started.
3. Design
3.1 Architecture

The Architecture Diagram given above explains the high-level design of Archangel. Given below is a quick overview of each component.
.puml files used to create diagrams in this document can be found in the diagrams folder. Refer to the PlantUML Tutorial at se-edu/guides to learn how to create and edit diagrams.
Main has two classes called Main and MainApp. It is responsible for,
- At app launch: Initializes the components in the correct sequence, and connects them up with each other.
- At shut down: Shuts down the components and invokes cleanup methods where necessary.
Commons represents a collection of classes used by multiple other components.
The rest of Archangel consists of four components.
-
UI: The UI of Archangel. -
Logic: The command executor. -
Model: Holds the data of Archangel in memory. -
Storage: Reads data from, and writes data to, the hard disk.
Each of the four components,
- defines its API in an
interfacewith the same name as the Component. - exposes its functionality using a concrete
{Component Name}Managerclass (which implements the corresponding APIinterfacementioned in the previous point.
For example, the Logic component (see the class diagram given below) defines its API in the Logic.java interface and exposes its functionality using the LogicManager.java class which implements the Logic interface.
 Diagram 3.1.1 : Logic Class Diagram
How the architecture components interact with each other
The Sequence Diagram below shows how the components interact with each other for the scenario where the user issues the command delete 1.
 Diagram 3.1.2 : Architecture Sequence Diagram
The sections below give more details of each component.
3.2 UI component
 Diagram 3.2 : UI Class Diagram
API :
Ui.java
The UI consists of a MainWindow that is made up of parts e.g.CommandBox, ResultDisplay, PatientListPanel, AppointmentListPanel, StatusBarFooter etc. All these, including the MainWindow, inherit from the abstract UiPart class.
The UI component uses JavaFx UI framework. The layout of these UI parts are defined in matching .fxml files that are in the src/main/resources/view folder. For example, the layout of the MainWindow is specified in MainWindow.fxml
The UI component,
- Executes user commands using the
Logiccomponent. - Listens for changes to
Modeldata so that the UI can be updated with the modified data.
3.3 Logic component
 Diagram 3.3.1 : Logic Class Diagram
API :
Logic.java
-
Logicuses theAddressBookParserclass to parse the user command. - This results in a
Commandobject which is executed by theLogicManager. - The command execution can affect the
Model(e.g. adding a patient). - The result of the command execution is encapsulated as a
CommandResultobject which is passed back to theUi. - In addition, the
CommandResultobject can also instruct theUito perform certain actions, such as displaying help to the user.
Given below is the Sequence Diagram for interactions within the Logic component for the execute("delete 1") API call.
 Diagram 3.3.2 : Delete Sequence Diagram
DeleteCommandParser should end at the destroy marker (X) but due to a limitation of PlantUML, the lifeline reaches the end of diagram.
3.4 Model component
 Diagram 3.4 : Model Class Diagram
API : Model.java
The Model,
- stores a
UserPrefobject that represents the user’s preferences. - stores Archangel’s data.
- exposes an unmodifiable
ObservableList<Patient>that can be ‘observed’ e.g. the UI can be bound to this list so that the UI automatically updates when the data in the list change. - does not depend on any of the other three components.
Tag list in the AddressBook, which Patient references. This allows AddressBook to only require one Tag object per unique Tag, instead of each Patient needing their own Tag object.
3.5 Storage component
 Diagram 3.5 : Storage Class Diagram
API : Storage.java
The Storage component,
- can save
UserPrefobjects in json format and read it back. - can save Archangel’s data in json format and read it back.
3.6 Common classes
Classes used by multiple components are in the seedu.addressbook.commons package.
4. Implementation
As the previous Design section illustrated the general architecture of the app, this section aims to illustrate what happens at the deeper levels. This section describes some noteworthy details on how certain features are implemented.
4.1 Patient Commands
4.1.1 Before we dive in
It is important to know the architectural design of the app to be able to understand this section. Please ensure that you have read section 3.3 Logic components before diving deeper into this section as most implemented features make use of the same principles.
4.1.2 Structure of Patient Commands
The following diagram shows the overview of a generic patient command PatientXYZCommand, where XYZ could be Add, Delete etc. :
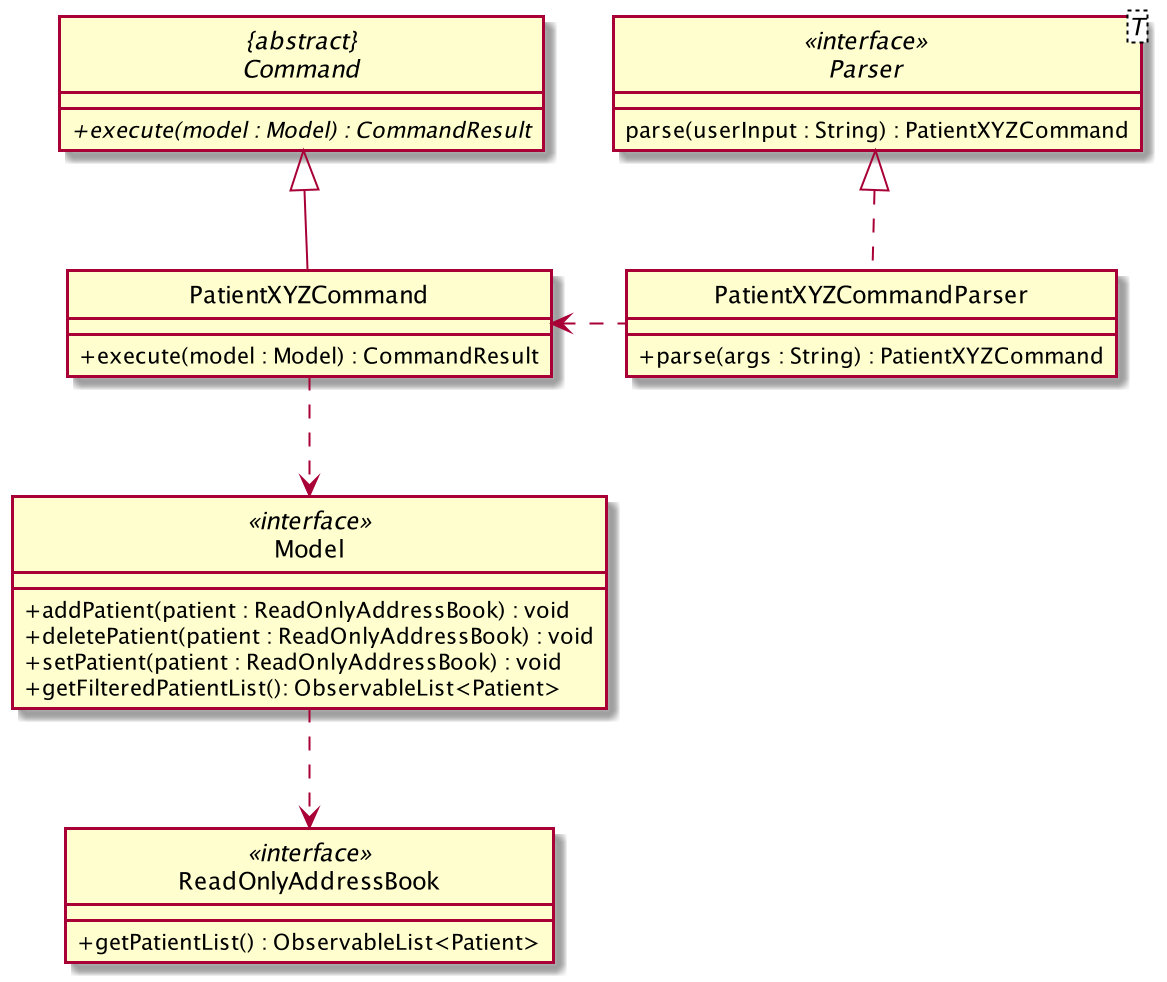 Diagram 4.1.2 : Patient Command Structure Diagram
In each PatientXYZCommand class, there are static messages as follows:
-
COMMAND_WORD- String denoting the command wordParserwill check for to determine which type of command user input should invoke. -
MESSAGE_USAGE- String containing a input guide message for when user inputs are in incorrect formats.
4.1.3 Add Patient
Implementation
The Add patient command has a highly similar logic and implementation as a Delete patient command (see Diagram 4.1.2 and 3.3.2).
The only notable difference is that an Add patient command does not require parsing of an Index. (i.e. parse("1") is not applicable)
</br>On execution, the Patient object stored in the PatientAddCommand object will be added to the Model.
4.1.4 Delete Patient
Implementation
The arguments of a Delete patient command includes the Index of the Patient to be deleted (see Diagram 4.1.2 and 3.3.2). </br>
On execution, the Index object stored in the PatientDeleteCommand object will be used to locate the Patient object to be deleted from the Model.
4.1.5 Edit Patient
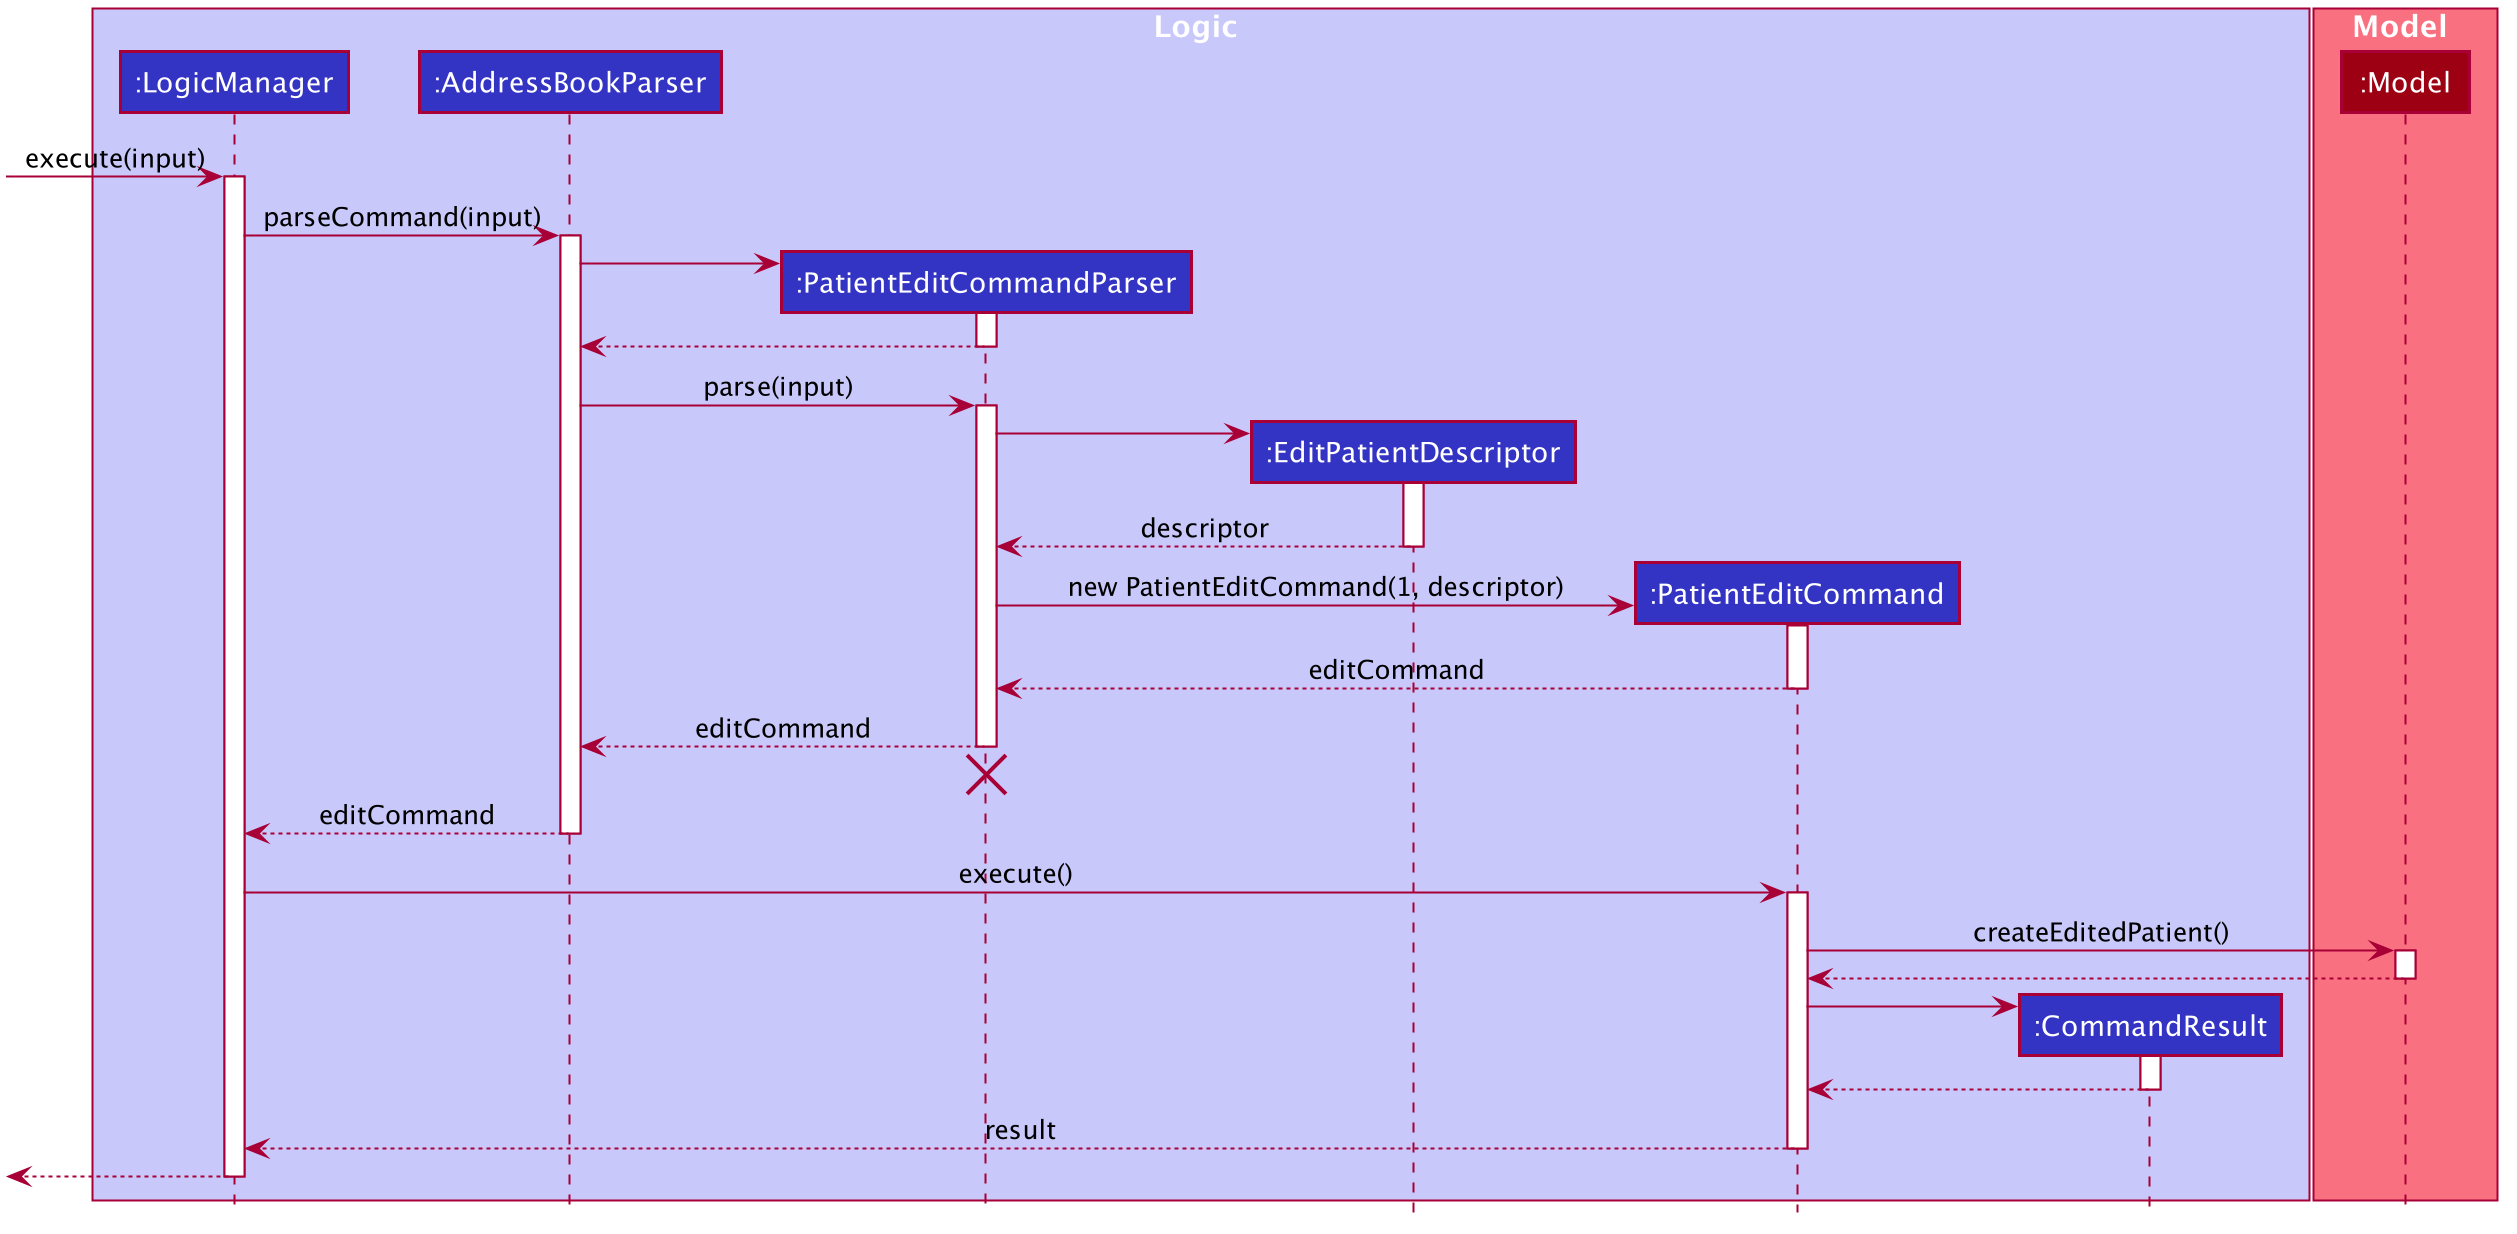 Diagram 4.1.5 : PatientEditCommand Sequence Diagram
Implementation
With reference to Diagram 4.1.5 above, the arguments of an Edit patient command includes the Index of the Patient selected for changes and the changes the User wants to make to the individual fields of a single Patient. </br>
What happens at EditCommandParser().parse(arguments):
- An
EditPatientDescriptorobject is first created. AnEditPatientDescriptorobject contains all fields that aPatienthas and acts as a placeholder for the changes. - For each field input present in the argument, that respective field of the
EditPatientDescriptorobject will be set accordingly. PatientFindCommand This object contains theIndexof thePatientselected for changes, and theEditPatientDescriptorobject created in Step 1 and fully modified by Step 2. - This
PatientEditCommandobject will stored under thecommandvariable and then be executed by theLogicManager. - At execution, an
editedPatientobject will be created. ThiseditedPatientobject contains all fields that a Patient has and acts as a placeholder for both the changes from theEditPatientDescriptorobject and unchanged fields of the originalPatient. - Since the
editedPatientobject will contain the corrected set of fields to be reflected on the original Patient, thePatientEditCommandwill replace the currentPatientobject with theeditedPatientobject.
This is how Editing of Patient information is implemented.
4.1.6 Find Patient
Implementation
The arguments of a Find patient command includes the Keywords that the User wants to search up. Keywords are seperated by spaces.
What happens at FindCommandParser().parse(arguments):
-
Keywordsare put into annameKeywordsarray. - A new
SearchNameFilterobject is created with thenameKeywordsarray converted to a List. - A new
PatientFindCommandobject is created with theSearchNameFilterobject, and it is then returned to theLogicManagerfor execution. - At execution, a list filtered with only those that are related to the
Keywordsis shown.
This is how Find Patient is implemented.
4.2 Appointment Commands
In this section, we will introduce all Appointment-type commands and how they work.
Due to similar implementation of Appointment-type and Patient-type commands
(e.g. p-edit and a-edit make use of the same logic), we will be referring to the patient-type counterpart of the same command where applicable.
Any noteworthy details will still be included under each Appointment-type command below.
4.2.1 Schedule Appointment
4.2.1.1 Implementation
The implementation of scheduling an appointment has a similar execution as adding a patient (see 4.1.3). Take note that backdated appointments are allowed (i.e. appointments scheduled before current time) to be able to digitise existing appointment records from clinics.
The Appointment class stores relevant fields (e.g. AppointmentTime, Description) and the Patient, and/or a string representing the patient’s index in the ObservableList<Patient>, depending on which constructor is invoked during execution.
4.2.1.2 Reason for design of implementation:
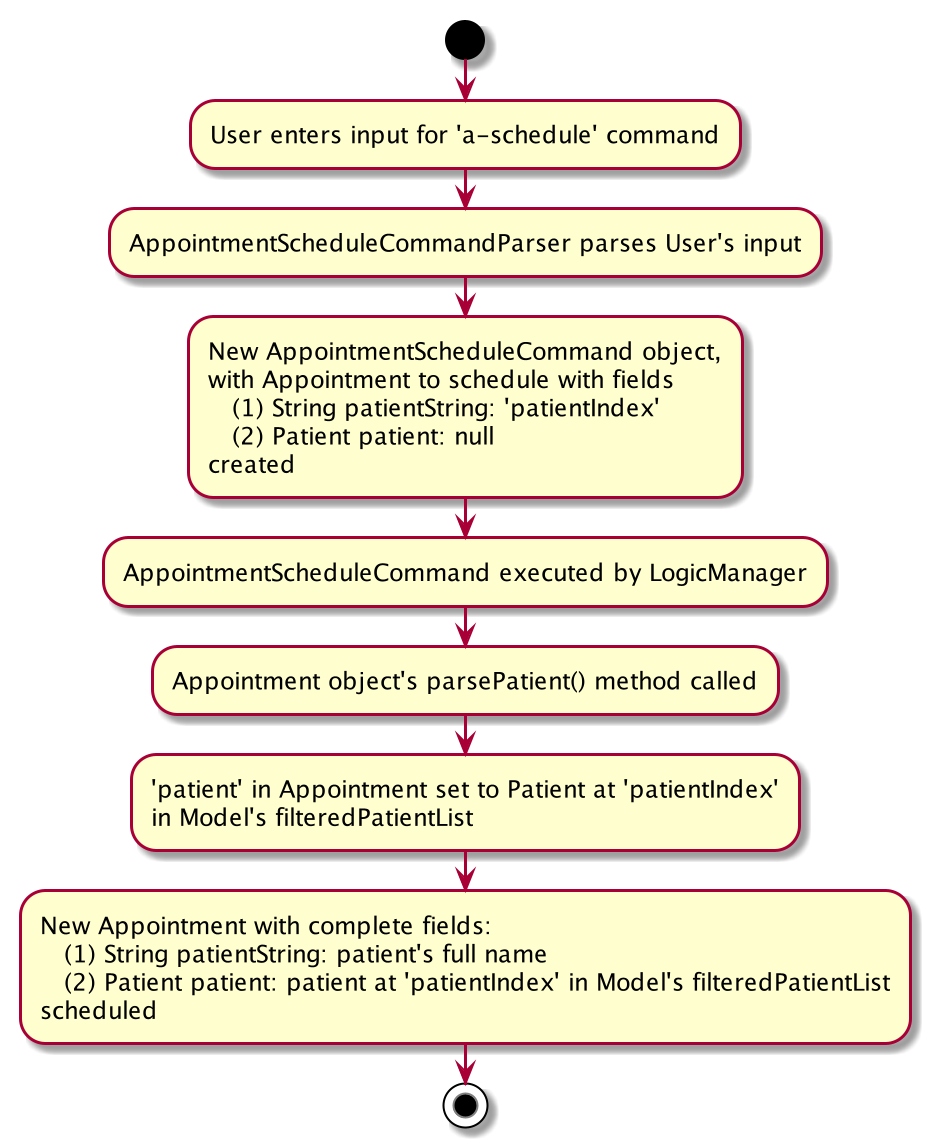 Diagram 4.2.1.2 : AppointmentScheduleCommand Activity Diagram
The reason for having 2 Appointment constructors is to improve the ease of scheduling an appointment by the user using the CLI.
To address the problem of mandatory fields being highly time-consuming, we have decided to allow users to simply input a patientIndex to identify the patient from the visible ObservableList<Patient> without being concerned with typing the exact name or details of the desired patient to assign to the Appointment.
4.2.1.3 Design consideration:
Aspect: How Patient is stored in an Appointment object
-
Alternative 1 (current choice): Saves the
Patientobject and/or thepatientIndexString- Pros:
- Easy to implement, gives a less stringent check for
isSameAppointmentfor other Appointment-type commands (e.g.AppointmentEditCommand). - This allows for creation of
Appointmentobjects which are not duplicates yet have the samePatientand/orpatientIndexduring command execution.
- Easy to implement, gives a less stringent check for
- Cons: More test cases necessary to ensure that
patientIndexis correctly parsed and retrieved from patient list inAddressBook.
- Pros:
-
Alternative 2: Saves only the
Patientobject after parsing thepatientIndexString- Pros: No extra parsing/handling of
PatientonceAppointmentobject has been created. - Cons: Difficult to edit the patient-field in an
Appointmentobject as all fields of thePatientobject itself must be present.
- Pros: No extra parsing/handling of
4.2.2 Delete Appointment
Implementation
The implementation of deleting an appointment has a similar execution as deleting a patient (see 4.1.4).
4.2.3 Edit Appointment
4.2.3.1 Implementation
The implementation of editing an appointment has a similar execution as editing a patient (see 4.1.5). Take note that backdated appointments are allowed to be able to digitise existing appointment records from clinics .
4.2.3.2 Reason for design of implementation:
The reason for having an EditAppointmentDescriptor is to enforce immutability by always creating the edited appointment as a new Appointment object.
4.2.3.3 Design consideration:
Aspect: How Patient is edited in an Appointment object
-
Alternative 1 (current choice): Edits the
Patientin theAppointmentusing apatientIndexString (e.g.a-edit 1 pt/2)- Pros: Easy for users to change the patient for the appointment using a single
patientIndex. - Cons:
patientIndexhas to be carefully parsed and retrieved from a patient list that correctly reflects the patient list on the GUI.
- Pros: Easy for users to change the patient for the appointment using a single
-
Alternative 2: Edits the
Patientin theAppointmentbypatientName(e.g.a-edit 1 pt/John Doe)- Pros: None.
- Cons: Greater difficulty for users to input the new
Patientsince thepatientNamemay not be unique nor accurate to an existing patient in the patient list.
4.2.4 Complete Appointment
Implementation
Sets a specified appointment as completed. The implementation of setting an appointment as completed has a similar execution as editing as appointment (see 4.2.3).
The unique classes associated to this command are :
-
AppointmentCommandParser: AppointmentCompleteCommandParser— Creates a new AppointmentCompleteCommand object. -
AppointmentCommand: AppointmentCompleteCommand— Identifies the specified appointment from list and passes it to ModelManager to set as completed.
4.2.5 Filter Appointment Commands
4.2.5.1 Structure
Commands involving filtering of the appointment work similarly by using filters to obtain the appointments needed. For this section, we will be exploring AppointmentFindPatientCommand which filters Appointments containing Patients whose name includes the given user input.
The Command, Parser and Predicate in the class diagram below can be replaced by different sets of values from Diagram 4.2.5.1b.
 Diagram 4.2.5.1a : Appointment Commands with Filters Class Diagram
Filter Appointment Commands including both its Parser and Predicate are listed below:
| Command | Parser | Predicate | Filters List by: |
|---|---|---|---|
| 1. AppointmentFindPatientCommand | AppointmentFindPatientCommandParser | SearchPatientFilter | Patient Name |
| 2. AppointmentTodayCommand | AppointmentTodayCommandParser | SearchAppointmentTodayFilter | Appointments occurring today |
| 3. AppointmentWeekCommand | AppointmentWeekCommandParser | SearchAppointmentWeekFilter | Appointments occurring this week |
| 4. AppointmentTagCommand | AppointmentTagCommandParser | SearchAppointmentTagsFilter | Appointment Tag |
| 5. AppointmentIsMissedCommand | AppointmentMissedCommandParser | SearchAppointmentMissedFilter | Missed Appointments |
| 6. AppointmentIsCompletedCommand | AppointmentIsCompletedCommandParser | SearchAppointmentCompletedFilter | Completed Appointments |
| 7. AppointmentListCommand | AppointmentListCommandParser | SearchAppointmentFilter | Pending Appointments |
Diagram 4.2.5.1b : Appointment Commands with Filters Class Diagram
4.2.5.2 Implementation
The search for appointment by patient name works by filtering the appointment list to show only those appointments with the given patient name.
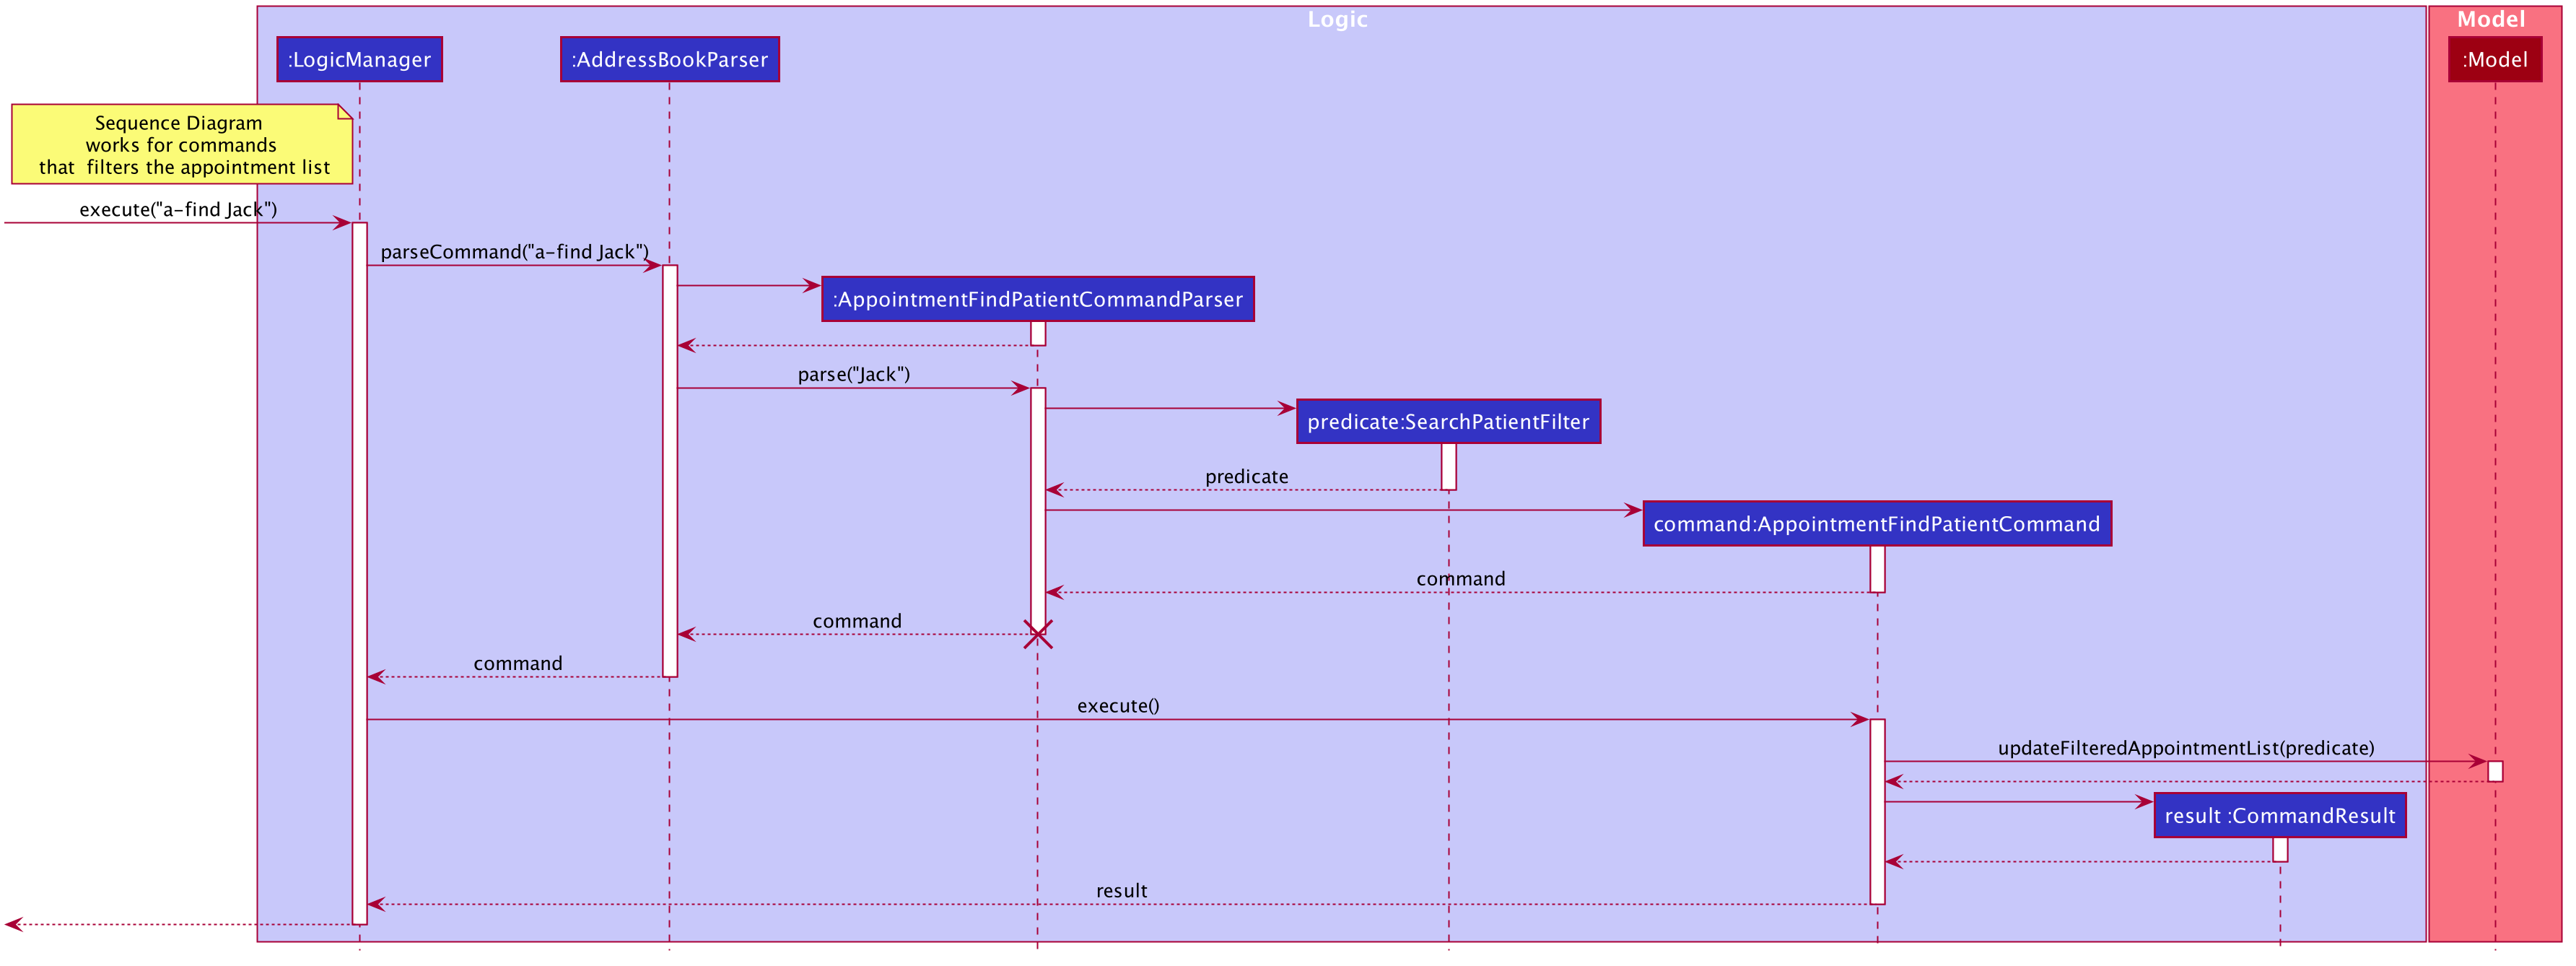
Diagram 4.2.5.2 : Appointment Commands with Filters Sequence Diagram
The unique classes associated to AppointmentFindPatientCommand command:
-
AppointmentFindPatientCommandParser— Parses input arguments and creates a new AppointmentFindPatientCommand object. -
SearchPatientFilter— Checks if the appointment contains any patient which contains any keywords form the arguments. -
AppointmentFindPatientCommand— Applies the filter to the appointment list.
The implementation of all listing filter appointment commands have a similar execution as AppointmentFindPatientCommand.
4.2.5.3 Design considerations
-
Alternative 1 (current choice): Store the appointments by date added.
- Pros: Easy to implement and less overhead operations when using adding appointments.
- Cons: May not be the fastest way to search for appointments.
-
Alternative 2: Store the appointments by tags and search the dates by Binary Search.
- Pros: Search operation for this is faster.
- Cons: Additional overhead every time you add an appointment as you need to know where to insert the command. You also need to update the sequence of storage file by tag every time you schedule an appointment. In addition, there might be a conflict for those appointments with more than one tags.
4.2.6 List All Appointments
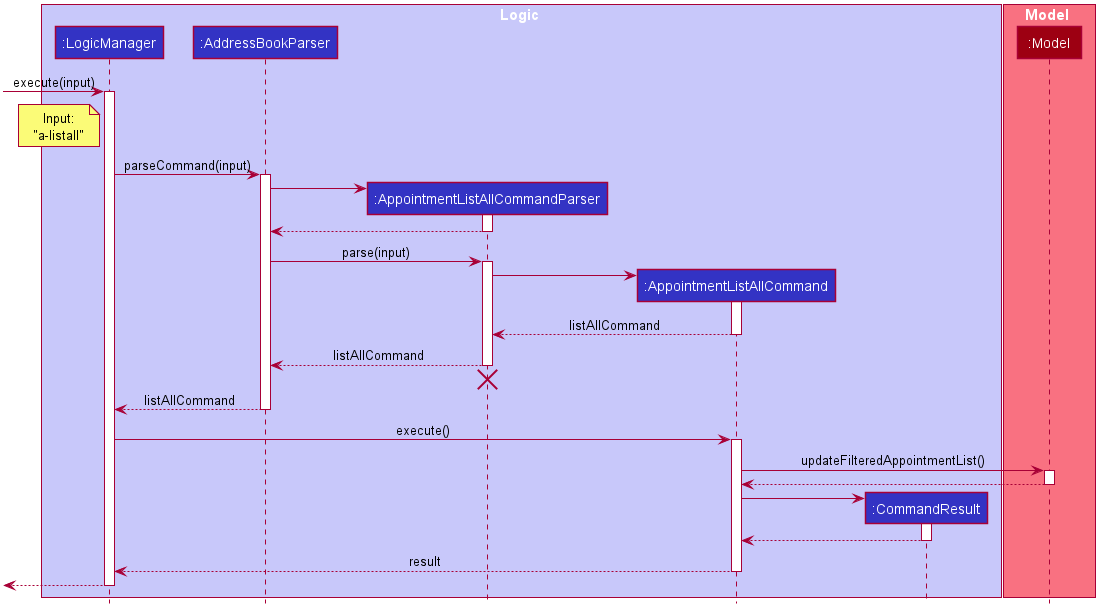 _Diagram 4.2.6 : Appointment List All Command Sequence Diagram
Implementation
Listing all past and upcoming appointments from the appointment list.
The unique classes associated to this command as shown from Diagram 4.2.6 are :
-
AppointmentCommandParser: AppointmentListAllCommandParser— Creates a new AppointmentListAllCommand object. -
AppointmentCommand: AppointmentListAllCommand— Updates filtered appointment list to show all appointments in Archangel.
4.3 Supporting Commands
4.3.1 Undo/redo feature
Implementation
The proposed undo/redo mechanism is facilitated by UserHistoryManager. It extends AddressBook with an undo/redo history, stored internally in userHistory as Stack<Pair<List<Patient>, List<Appointment>>>. Additionally, it implements the following operations:
-
UserHistoryManager#addHistory()— Saves the current address book state in its history. -
UserHistoryManager#undoHistory()— Restores the previous address book state from its history. -
UserHistoryManager#redoHistory()— Restores a previously undone address book state from its history.
These operations are exposed in the ModelManager class as ModelManager#getUserHistoryManager(), ModelManager#undoHistory() and Model#redoHistory() respectively.
Given below is an example usage scenario and how the undo/redo mechanism behaves at each step.
Step 1. The user launches the application for the first time. The UserHistoryManager will be initialized with the initial address book user history in the stack.

Step 2. The user executes delete 5 command to delete the 5th patient in the address book. The delete command calls UserHistoryManager#addHistory(), causing its current history to be saved into UserHistory in UserHistoryManager after the delete 5 command.

Step 3. The user executes add n/David … to add a new patient. The add command also calls UserHistoryManager#addHistory(), causing its current history to be saved into UserHistory in UserHistoryManager.

UserHistoryManager#addHistory(), so the address book state will not be saved into the userHistoryManager.
Step 4. The user now decides that adding the patient was a mistake, and decides to undo that action by executing the undo command. The undo command will call Model#undoHistory(), which will cause call UserHistoryManager#undoHistory(),popping the userHistory stack, adding the current history to redoHistory and removing the current history from UserHistory.
AddressBook#setPatients and AddressBook#setAppointments will be called, modifying the AddressBook and undo-ing the history.

Current History has a size of 1, having only the initial history, then there are no previous AddressBook history to restore. The undo command uses Model#canUndoAddressBook() to check if this is the case. If so, it will return an error to the user rather
than attempting to perform the undo.
The following sequence diagram shows how the undo operation works:

UndoCommand should end at the destroy marker (X) but due to a limitation of PlantUML, the lifeline reaches the end of diagram.
The redo command does the opposite — it calls Model#redoHistory(), which calls UserHistoryManager#redoHistory(), popping the redoHistory stack,modifying the AddressBook and redo-ing the history.
Step 5. The user then decides to execute the command a-list. Commands that do not modify the address book, such as a-list, will usually not call Model#undoHistory() or Model#redoHistory(). Thus, the UserHistory remains unchanged.

The following activity diagram summarizes what happens when a user executes a new command:

Reason for design of implementation:
The reason for the design of userHistory using a stack is due to the functionality of undoHistory(). We want to be able undo the latest changes to the UniquePatientList or UniqueAppointmentList.
This follows the Last In,First Out(LIFO) design which can be implementated using the stack data structure.
A concern using this design is that the memory usage might be undesirable due to the large of memory usage needed to store every user history at each command. However, after many test runs, we concluded that the memory usage of the user history was insignificant and thus this design can be safely implememented with no drawbacks.
Design consideration:
- This command does not work with filter commands (
a-completed,a-missed,a-upcoming,a-today,a-find,a-list) as its implementation purpose is to assist the user in undo-ing his changes, filter commands do not make changes to the data. It also does not work withp-editas the design requires patient details to be accurate as of time schedule, such that the records can accurately reflect the patient’s conditions at the time of the appointment.With this concern in mind, we disabledundoforp-editand the user can simply execute anotherp-editcommand to undo his changes.
Aspect: How undo & redo executes
-
Alternative 1 (current choice): Saves the entire address book.
- Pros: Easy to implement.
- Cons: May have performance issues in terms of memory usage.
-
Alternative 2: Individual command knows how to undo/redo by
itself.
- Pros: Will use less memory (e.g. for
delete, just save the patient being deleted). - Cons: We must ensure that the implementation of each individual command are correct.
- Pros: Will use less memory (e.g. for
-
Alternative 3: Individual command is contained in a
reversible-pair-actionclass. When we want toundo, we can just call itspair command.- Pros: Will use less memory (due to the fact that are not saving any additional data).
- Cons: Very difficult to implement, some commands might not have
pair command(e.g foredit, it is own pair command but pair command to call for undo is hard to implement).
4.4 Multi-threading
4.4.1 Timer Thread
Implementation
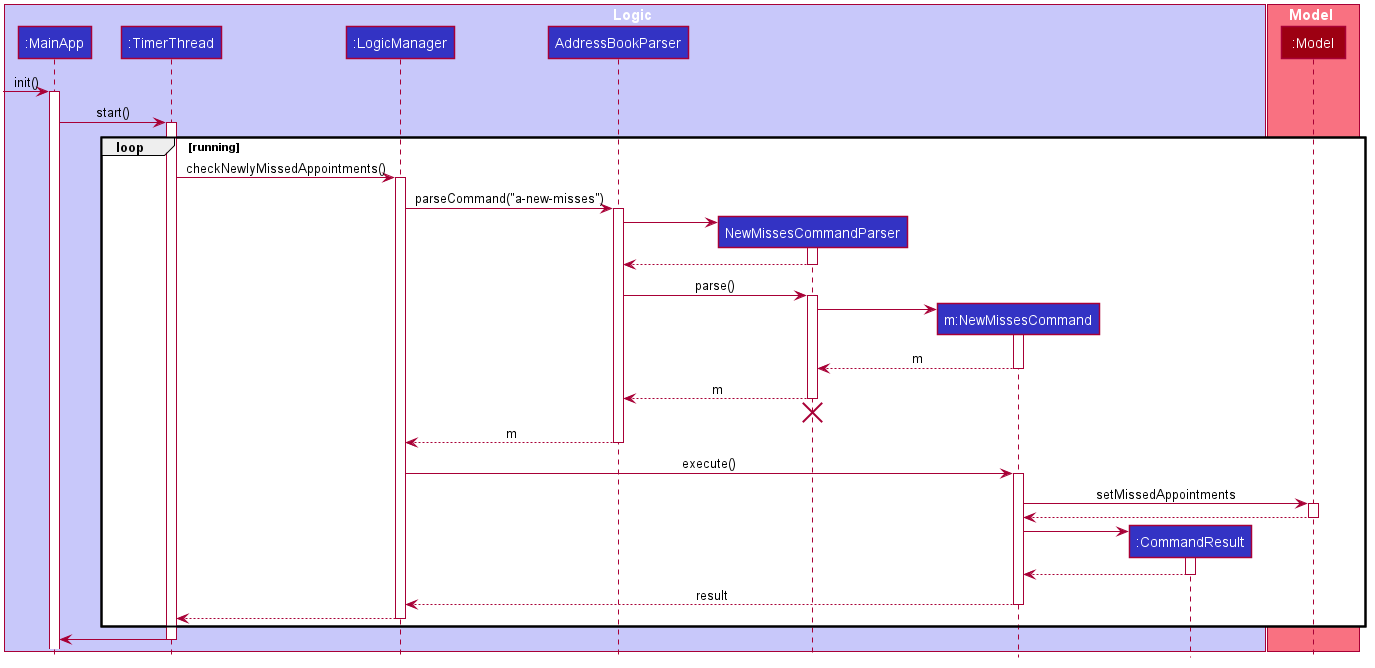
The TimerThread is a separate thread used for automatic tracking of missed appointments, and is initiated by MainApp.
Here is a summary of how the Timer Thread work:
- On initialization,
MainAppcreates an instance ofTimerThreadand calls it’srun()method to being running the thread. - While
TimerThreadis running, it sleeps for 1 minute using theThread.sleepmethod. - After sleeping,
TimerThreadwill callLogicManager’scheckNewlyMissedAppointments, which in turn will callAddressBookParsertoparseCommand("a-new-misses")). -
AddressBookParser’sparseCommand("a-new-misses")method will create aNewMissesCommandParserobject and call itsparse()method. - This
parse()method mentioned above will create aAppointmentNewMissesCommand. - The
parse()method will return aAppointmentNewMissesCommandobject to theLogicManagerfor execution. -
AppointmentNewMissesCommandobject’sexecute()method will be called and withinModel, everyAppointmentwhich end time has been passed by 30 minutes will be labelled as missed. - Steps 2 to 6 will repeat until the application is closed.
- On closing the application,
MainAppcalls theTimerThreadobject’ssetStop()method which will break the thread out of the loop.
Reason for design of implementation:
The reason for having a timer on a separate thread from the main app functionality to avoid any conflicts with the manual commands input from the user.
For ease of use, the user is not required to input any command for the TimerThread to run.
Design consideration:
-
Alternative 1 (current choice): Refresh for new misses in 1 minute intervals.
- Pros: Less behind the scenes computation overhead, allowing for a smoother user experience.
- Cons: Appointments may be labelled missed up to a minute late. However, this is a minor inconvenience and most likely will not be noticed by the user.
-
Alternative 2: Refresh for new misses in 10 second intervals.
- Pros: Appointments will be guaranteed to be correctly labelled.
- Cons: Additional computation overhead, leading to slower application perform. This problem will be emphasized even greater as more appointments are stored.
5. Documentation, logging, testing, configuration, dev-ops
6. Appendix: Requirements
6.1 Product scope
Target user profile:
- has a need to manage a significant number of patient’s contacts/details
- has a preference to check his schedule on desktop over handwritten schedule
- has a need to store patient’s information on desktop
- prefer desktop apps over other types
- can type fast
- prefers typing to mouse interactions
- is reasonably comfortable using CLI apps
Value proposition: provide an application for psychiatrists to manage their patient’s medical information and their upcoming appointments.
6.2 User stories
Priorities: High (must have) - * * *, Medium (nice to have) - * *, Low (unlikely to have) - *
| Priority | As a … | I want to … | So that I can… |
|---|---|---|---|
* * * |
Psychiatrist | view the appointment history of my patient | decide when I can schedule the next appointment for the patient. |
* * * |
Psychiatrist | delete full patient records | remove any irrelevant patient records |
* * * |
Psychiatrist | record details about the patient | access his/her psychotherapy progress. |
* * * |
Psychiatrist | view my patient’s medical information | access the type and dosage of medication to provide. |
* * * |
Psychiatrist | view my patient’s contact information | contact them for their appointments. |
* * * |
Psychiatrist | store my patient’s reviews/preference | alter the treatment plan to suit his preferences. |
* * |
Psychiatrist | search my appointment list by patient name | access see his progress across his appointments. |
* * |
Psychiatrist | search my appointment list by tags | see the trend of patients from similar groups. |
* * |
Psychiatrist | search my appointment list by current day | access only the appointments scheduled today. |
* * |
Psychiatrist | search my appointment list by current week | view my whole schedule this week. |
{More to be added}
6.3 Use cases
(For all use cases below, the System is Archangel (the AddressBook) and the Actor is the user, unless specified otherwise)
Use case: UC1 - Add a patient
MSS
- User requests to add a new patient to the list.
-
Archangel adds the patient.
Use case ends.
Extensions
-
1a. The patient already exists in the list.
-
1a1. Archangel shows duplicate patient error message.
Use case resumes at step 1.
-
-
1b. User inputs are invalid/incomplete.
-
1b1. Archangel shows an error message.
Use case resumes at step 1.
-
Use case: UC2 - Delete a patient
MSS
- User requests to list patients.
- Archangel shows a list of patients.
- User requests to delete a specific patient in the list.
-
Archangel deletes the patient.
Use case ends.
Extensions
-
2a. The list is empty.
Use case ends.
-
3a. The given index is invalid.
-
3a1. Archangel shows an error message.
Use case resumes at step 2.
-
Use case: UC3 - Edit a patient
MSS
- User requests to find a patient.
- Archangel shows the patient’s information.
- User requests to edit the patient’s information.
-
Archangel edits the patient’s information.
Use case ends.
Extensions
-
1a. The patient is not found.
-
1a1. Archangel shows an error message.
Use case ends.
-
-
3a. The patient is not found.
-
3a1. Archangel shows an error message.
Use case resumes at step 2.
-
-
3b. User inputs fields that are invalid/does not satisfy requirements.
-
3b1. Archangel shows an error message.
Use case resumes at step 2.
-
Use case: UC4 - Schedule a patient appointment
MSS
- User requests to schedule a patient appointment.
-
Archangel schedule the patient appointment.
Use case ends.
Extensions
-
1a. The appointment has conflict with another appointment.
-
1a1. Archangel shows an error message.
Use case resumes at step 1.
-
-
1b. The appointment’s date/timing is invalid.
-
1b1. Archangel shows an error message.
Use case resumes at step 1.
-
-
1c. The patient to be added to the appointment does not exist.
-
1c1. Archangel shows an error message.
Use case resumes at step 1.
-
Use case: UC5 - Delete a patient appointment
MSS
- User requests to delete a specific appointment in the list.
-
Archangel deletes the appointment.
Use case ends.
Extensions
-
1a. The appointment does not exist.
-
1a1. Archangel shows an error message.
Use case resumes at step 1.
-
-
1b. The appointment list is empty.
-
1a1. Archangel shows an error message.
Use case resumes at step 1.
-
Use case: UC6 - Edit an appointment
MSS
- User requests to edit the appointment’s information.
-
Archangel edits the appointment’s information.
Use case ends.
Extensions
-
1a. The appointment is not found.
-
1a1. Archangel shows an error message.
Use case ends.
-
-
1b. User inputs fields that are invalid/does not satisfy requirements.
-
1b1. Archangel shows an error message.
Use case resumes at step 1.
-
Use case: UC7 - Complete an appointment
MSS
- User requests to set an appointment as completed.
-
Archangel sets the appointment as completed.
Use case ends.
Extensions
-
1a. The appointment is not found.
-
1a1. Archangel shows an error message.
Use case ends.
-
-
1b. The appointment list is empty.
-
1a1. Archangel shows an error message.
Use case resumes at step 1.
-
Use case: UC8 - Filter appointment list to find the upcoming appointments
MSS
- User requests to view only upcoming appointments.
-
Archangel displays only upcoming appointments in the dashboard.
Use case ends.
Extensions
-
1a. User chose to view in the calendar tab.
-
1a1. Archangel shows the upcoming appointments in calendar format.
Use case ends.
-
Use case: UC9 - Filter appointment list to find the appointments occuring today This case is similar to UC8, without the Extensions.
Use case: UC10 - Filter appointment list to find tagged appointments
MSS
- User requests to view only tagged appointments with their input keywords.
-
Archangel displays tagged appointments matching the keywords
Use case ends.
Extensions
-
1a. The keywords did not match any tags.
-
1a1. Archangel was not able to list down any appointments.
Use case ends.
-
Use case: UC11 - Filter appointment list by patients This case is similar to UC10, with the filter being the patient name.
Use case: UC12 - Undo command
MSS
- User requests to undo a previous command.
-
Archangel reverts back to state before previous command.
Use case ends.
Extensions
-
1a. User has not executed any undo-able commands.
-
1a1. Archangel shows an error message.
Use case ends.
-
Use case: UC13 - Redo command
MSS
- User requests to redo a command that was undone.
-
Archangel reverts back to state before undo command.
Use case ends.
Extensions
-
1a. User has not undone any command.
-
1a1. Archangel shows an error message.
Use case ends.
-
Use case: UC14 - Close Archangel program
MSS
- User finishes using Archangel program.
-
User closes the program.
Use case ends.
Extensions
-
1a. The user does not close the program using the correct command/action.
-
1a1. Archangel continues to run.
Use case ends.
-
6.4 Non-Functional Requirements
- Should work on any mainstream OS as long as it has Java
11or above installed. - Should be able to hold up to 1000 patients without a noticeable sluggishness in performance for typical usage.
- A user with above average typing speed for regular English text (i.e. not code, not system admin commands) should be able to accomplish most of the tasks faster using commands than using the mouse.
- Should be able to schedule up to 100 appointments per patient without a noticeable sluggishness in performance for typical usage.
{More to be added}
6.5 Glossary
- Mainstream OS: Windows, Linux, Unix, OS-X
7. Appendix A: Instructions for manual testing
Given below are instructions to test the app manually.
7.1 Launch and shutdown
-
Initial launch
-
Download the jar file and copy into an empty folder
-
Double-click the jar file Expected: Shows the GUI with a set of sample contacts. The window size may not be optimum.
-
-
Saving window preferences
-
Resize the window to an optimum size. Move the window to a different location. Close the window.
-
Re-launch the app by double-clicking the jar file.
Expected: The most recent window size and location is retained.
-
-
{ more test cases … }
7.2 Deleting a patient
-
Deleting a patient while all patients are being shown
-
Prerequisites: List all patients using the
listcommand. Multiple patients in the list. -
Test case:
delete 1
Expected: First contact is deleted from the list. Details of the deleted contact shown in the status message. Timestamp in the status bar is updated. -
Test case:
delete 0
Expected: No patient is deleted. Error details shown in the status message. Status bar remains the same. -
Other incorrect delete commands to try:
delete,delete x,...(where x is larger than the list size)
Expected: Similar to previous.
-
-
{ more test cases … }
7.3 Saving data
-
Dealing with missing/corrupted data files
- {explain how to simulate a missing/corrupted file, and the expected behavior}
-
{ more test cases … }
8. Appendix B: Effort
8.1 Difficulty Level
Archangel is a brown-field project that has modified and improved features from the original AB3. Our Archangel project implements features for 2 main entities/models, namely Appointments and Patients. The inclusion of the Appointment model has increased the functionality and difficulty of the project compared to AB3 which only had Persons. Additionally, our team also explored the use of other external features such as iCalendarAgenda to improve the usability of our application.
8.2 Challenges Faced
As more features were implemented, we faced challenges that arose from the dependencies between the Appointment and Patient classes in order to make Archangel’s functionalities more user-centric and convenient for users (e.g. Deleting a patient also results in deletion of Appointment to reduce obsolete data). Many of the bugs we encountered at the beginning of the project were also due to unfamiliarity with the code base, but as time went by, identified bugs have been resolved to result in the Archangel application today.
9. Acknowledgments
9.1 Code Related
- Implementation of Calendar feature using iCalendarAgenda Credits to Tae Kwon from CS2103T-W11-4 for sharing his code base and knowledge of iCalendarAgenda.
- Implementation of Tabs in the UI is inspired by KeepToo Youtube Channel